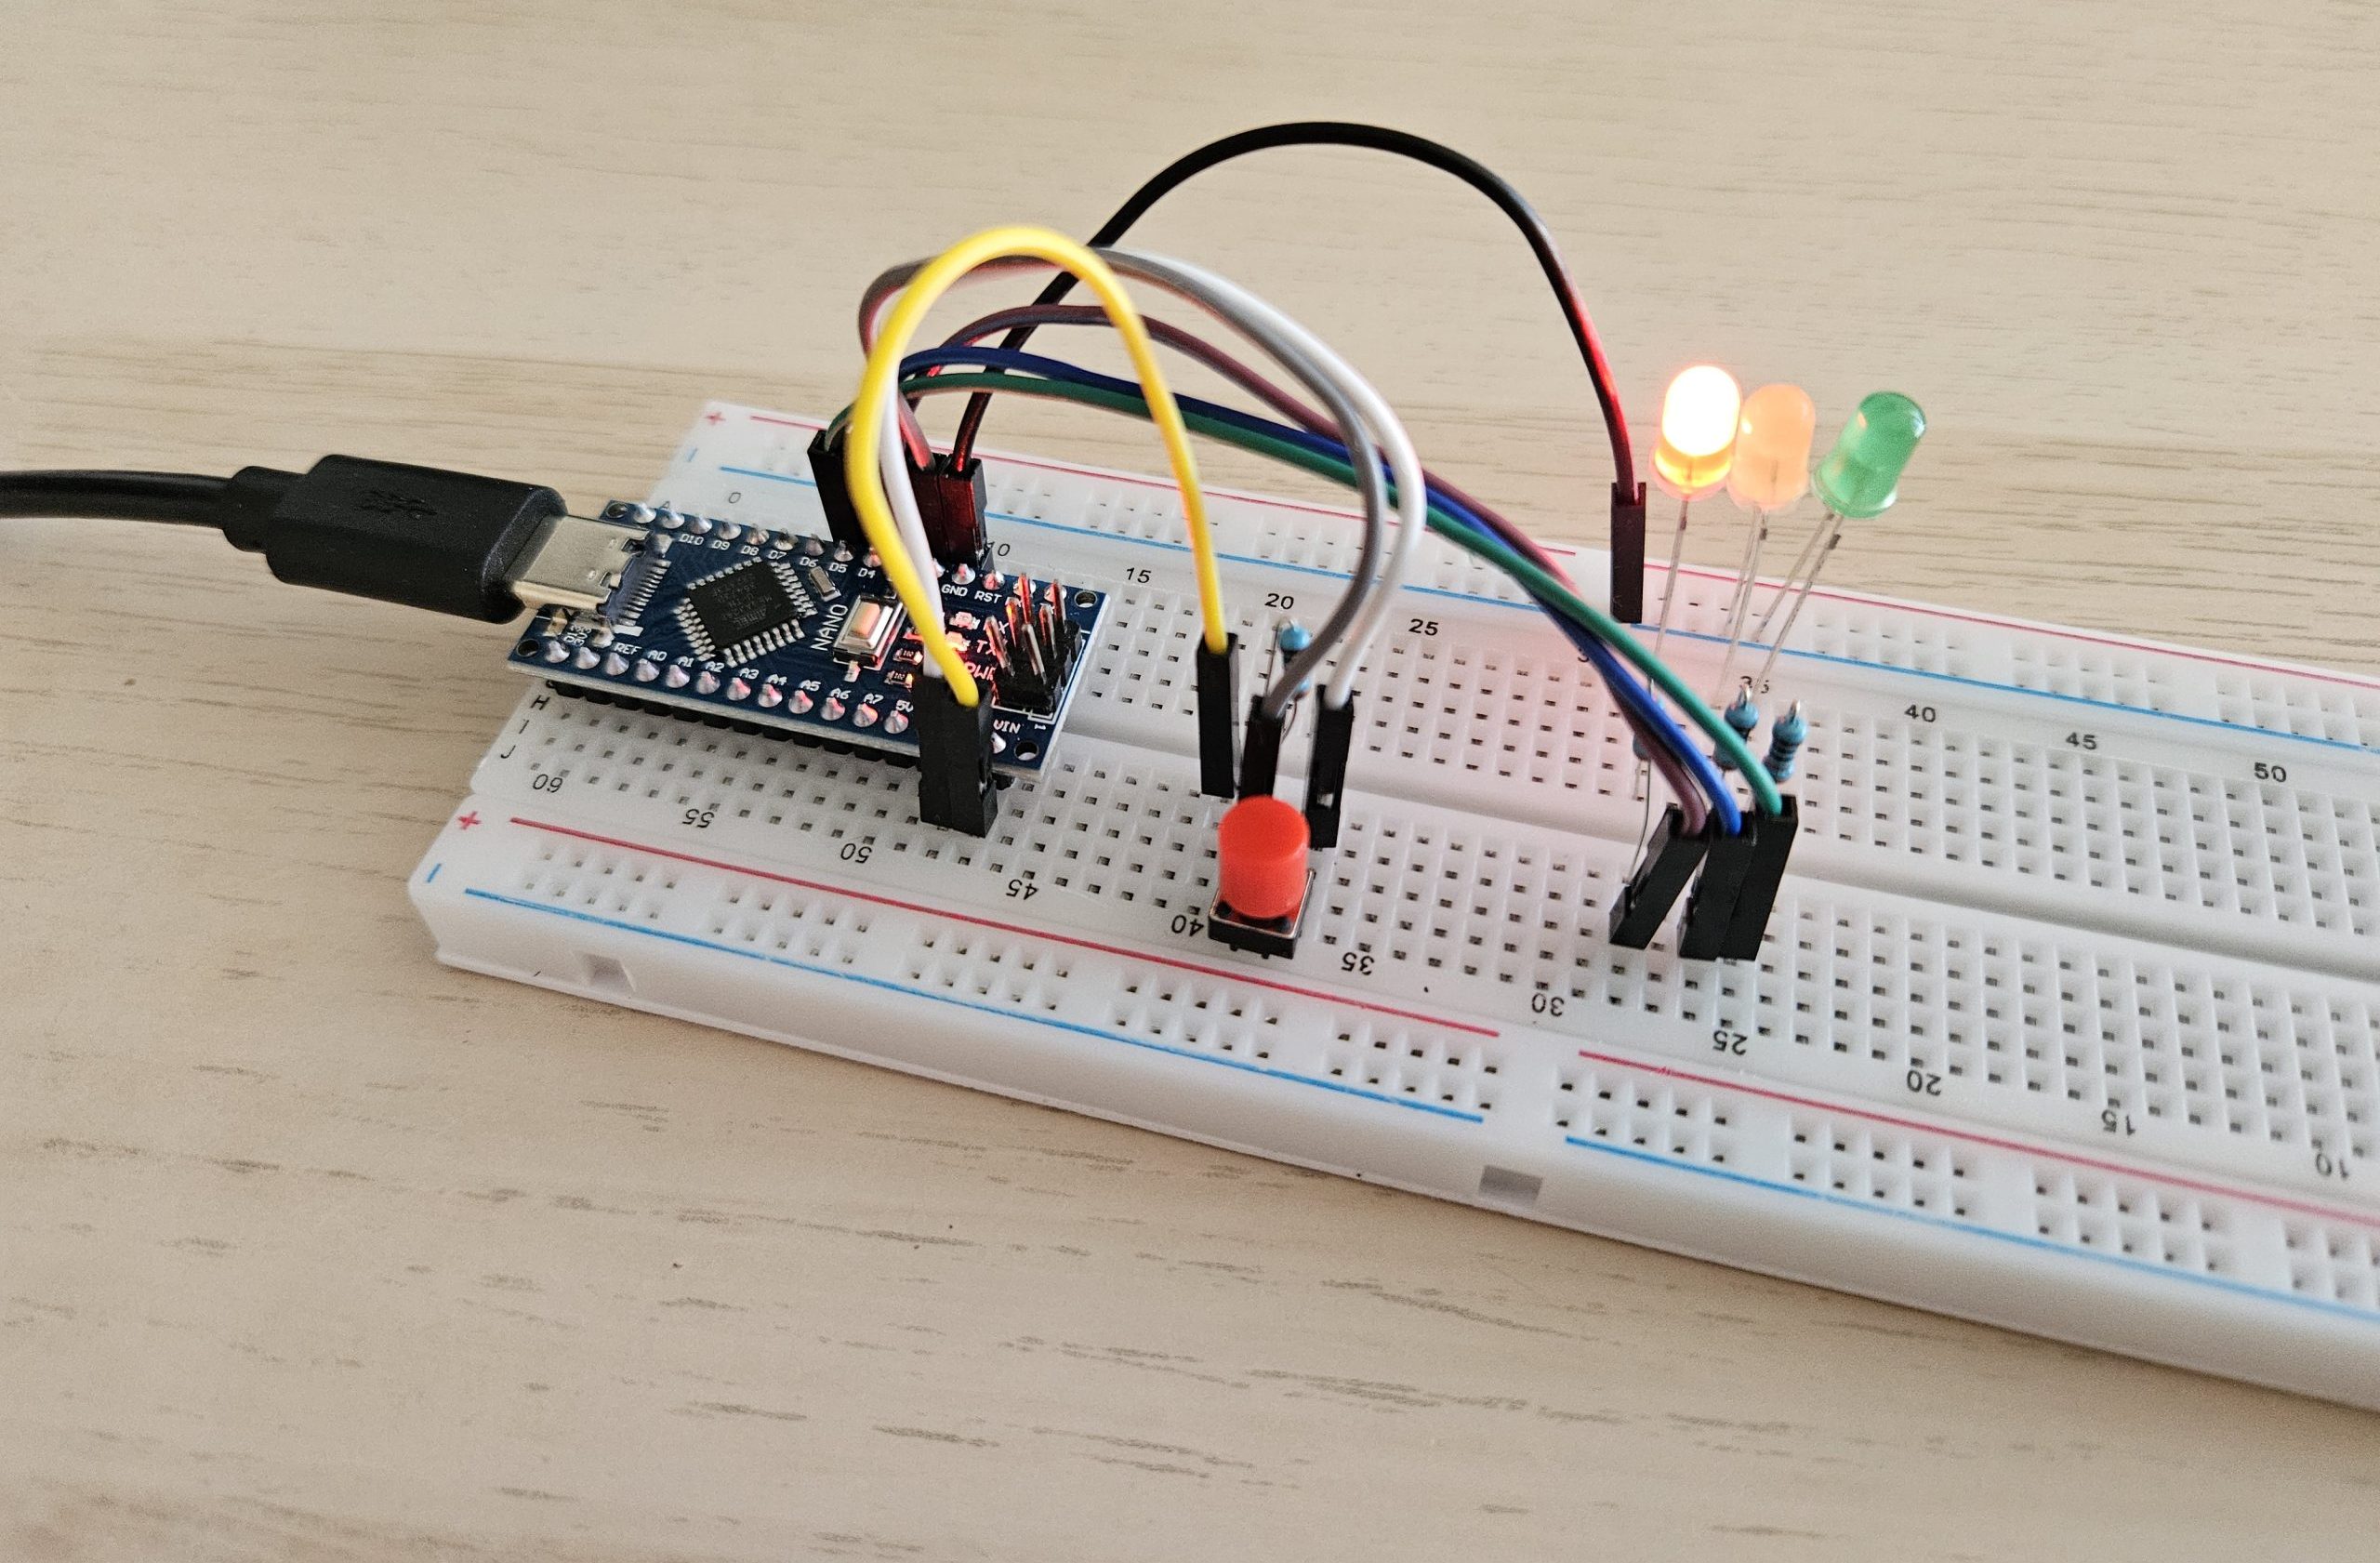
In this project, I created a simple traffic light system using an Arduino Nano and three LEDs (red, yellow, and green) controlled by a button. The system simulates a basic traffic light sequence, with the green light as the default. When the button is pressed, the green light flashes three times before transitioning to yellow for 2.3 seconds, then red for 5 seconds, and finally both red and yellow for 2 seconds before returning to green. This project is a fun and practical way to learn about controlling LEDs and button inputs with Arduino.
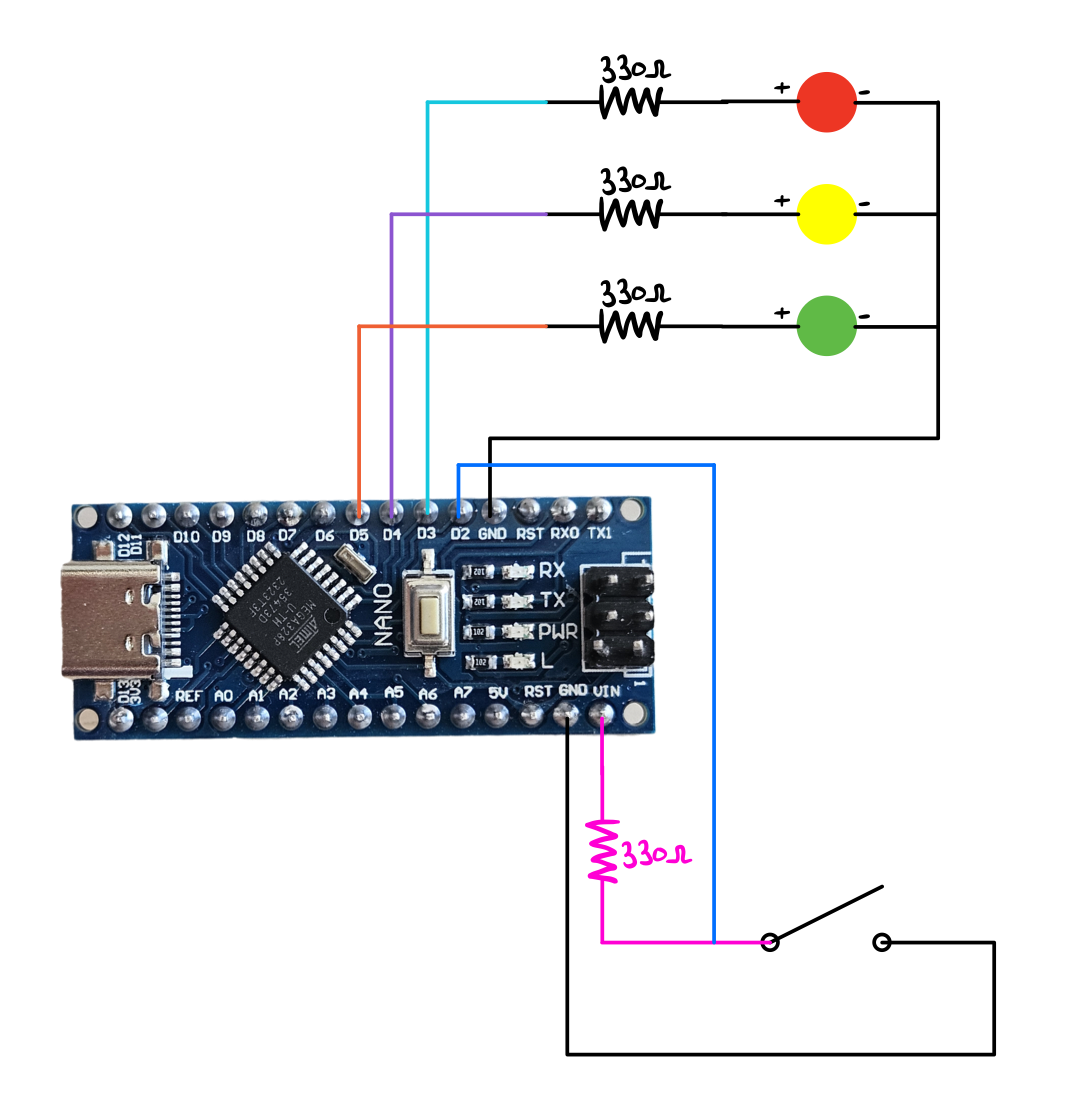
Scheme:
Code:
void setup() { pinMode(2, INPUT); // Button input pinMode(3, OUTPUT); // Red light pinMode(4, OUTPUT); // Yellow light pinMode(5, OUTPUT); // Green light}void loop() { // Read the state of the button (pin 2) bool buttonState = digitalRead(2); if (buttonState == LOW) { // Button pressed: Flash the green light 3 times and then switch to red and yellow sequence // Flashing the green light 3 times for (int i = 0; i < 4; i++) { digitalWrite(5, HIGH); // Green ON delay(700); // Wait for 700 ms digitalWrite(5, LOW); // Green OFF delay(700); // Wait for 700 ms } // Yellow light ON for 1.5 seconds digitalWrite(4, HIGH); // Yellow ON delay(2300); // Wait for 2.3 seconds digitalWrite(4, LOW); // Yellow OFF // Red light ON for 5 seconds digitalWrite(3, HIGH); // Red ON delay(5000); // Wait for 5 seconds digitalWrite(3, LOW); // Red OFF // Yellow light ON for 2 seconds (before switching back to green) digitalWrite(3, HIGH); // Red ON digitalWrite(4, HIGH); // Yellow ON delay(2000); // Wait for 2 seconds digitalWrite(3, LOW); // Red OFF digitalWrite(4, LOW); // Yellow OFF } else { // Button not pressed: green light stays on digitalWrite(3, LOW); // Red OFF digitalWrite(4, LOW); // Yellow OFF digitalWrite(5, HIGH); // Green ON }}Code Explnation:
This Arduino code controls three LEDs (red, yellow, and green) based on the state of a button connected to pin 2. Here’s a breakdown of the program:
Setup Function (void setup()):
- pinMode(2, INPUT);
- Configures pin 2 as an input to read the button state.
- pinMode(3, OUTPUT);
- Configures pin 3 as an output to control the red LED.
- pinMode(4, OUTPUT);
- Configures pin 4 as an output to control the yellow LED.
- pinMode(5, OUTPUT);
- Configures pin 5 as an output to control the green LED.
This sets up the necessary pin modes for reading the button and controlling the LEDs.
Loop Function (void loop()):
The loop() function continuously runs and performs actions based on the state of the button (pressed or not pressed).
- Reading the Button State:
bool buttonState = digitalRead(2);- Reads the state of pin 2 (button). The value is stored in the variable
buttonState. - If the button is pressed, the state will be
LOW(because it’s connected to ground when pressed). - If the button is not pressed, the state will be
HIGH.
- Reads the state of pin 2 (button). The value is stored in the variable
- When Button is Pressed (
buttonState == LOW):- If the button is pressed (reads
LOW), the following sequence happens:
a. Flashing the Green Light (3 Times):
- The green light (pin 5) will flash ON and OFF three times in the loop.
for (int i = 0; i < 4; i++) {

digitalWrite(5, HIGH);  // Green ON

delay(700);             // Wait for 700 ms

digitalWrite(5, LOW);   // Green OFF

delay(700);             // Wait for 700 ms

}
- The
forloop repeats this ON/OFF cycle 4 times. For each cycle:- Green LED turns ON, waits for 700 ms.
- Green LED turns OFF, waits for another 700 ms.
- The
b. Yellow Light ON for 2.3 Seconds:
- After the green light flashes, the yellow light (pin 4) turns on for 2.3 seconds:
digitalWrite(4, HIGH); // Yellow ON

delay(2300);           // Wait for 2.3 seconds

digitalWrite(4, LOW);  // Yellow OFF
c. Red Light ON for 5 Seconds:
- Next, the red light (pin 3) turns on for 5 seconds:
digitalWrite(3, HIGH); // Red ON

delay(5000);           // Wait for 5 seconds

digitalWrite(3, LOW);  // Red OFF
d. Red and Yellow Lights ON Together for 2 Seconds:
- Both the red and yellow lights turn on together for 2 seconds, before switching back to the green light:
digitalWrite(3, HIGH); // Red ON

digitalWrite(4, HIGH); // Yellow ON

delay(2000);           // Wait for 2 seconds

digitalWrite(3, LOW);  // Red OFF

digitalWrite(4, LOW);  // Yellow OFF
- If the button is pressed (reads
- When Button is Not Pressed (
else):- If the button is not pressed, the green light (pin 5) stays ON:
digitalWrite(3, LOW);  // Red OFF

digitalWrite(4, LOW);  // Yellow OFF

digitalWrite(5, HIGH); // Green ON
- Red and yellow lights remain OFF.
- If the button is not pressed, the green light (pin 5) stays ON:
Summary of the Code’s Behavior:
- Default state (no button press): Green light is ON.
- Button pressed: The green light flashes three times, followed by the yellow light for 2.3 seconds, the red light for 5 seconds, and both red and yellow lights for 2 seconds. Then it returns to the green light.